TAGS, TAGS, TAGS!


Mandy Pätzold
Hey there!
My name is Mandy and I’m a stampaholic, jewelry designer, mom of two, wife and coffee & book addict from Potsdam (Germany). I first stepped into the world of stamping and paper crafting in October 2016.
I like card making the most, but I also enjoy making mini albums, gift packaging and layouts.
What I love about my hobby are the people I met and the friends I made on my way so far.
Hi crafty friends,
today it's all about tags. I love tags! I love to have them on hand as I wrap my gifts and even by themself they make a great gift. How about you? Do you like tags? Write it in the comments.
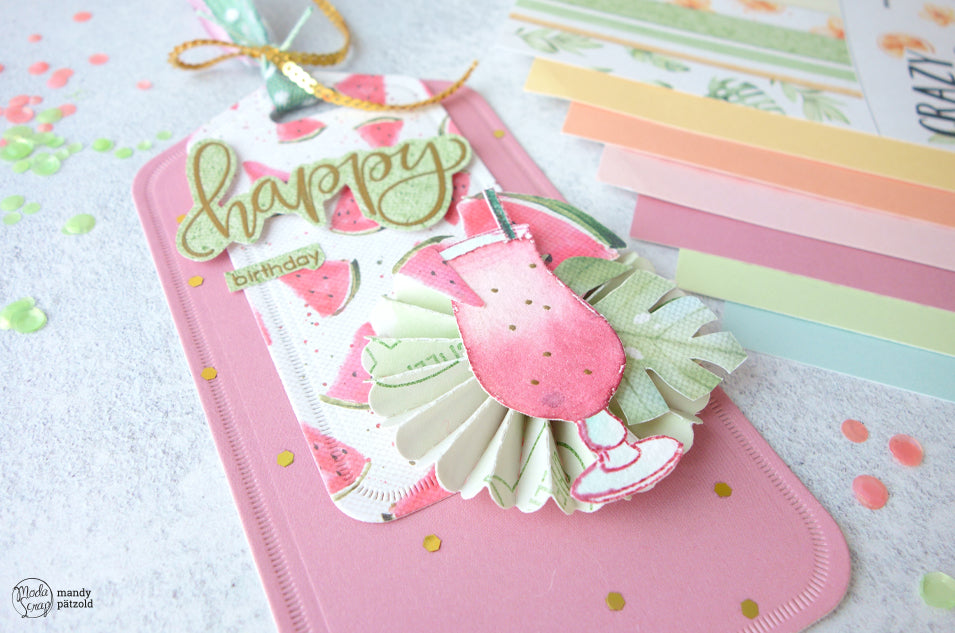
I've chosen a very summerly theme for my tags and used the gorgeous pastel paper collection (12x12") as a base. You can choose between 12 soft colors and every back side has a polka dot pattern, so lovely.The exotic cherry on top is the "Crazy Summer" paper pad (6x6"), that has some really great designs.
I created six different tags by using the big and the middle "Hanging Tag Die". The big one is to write on some greetings and the small one is for the decoration and to hide the greeting.
As ornaments I used some drinks of the "Party Time" stamps, because they match so well with the "Crazy Summer" paper. I embossed some and watercolored them in matching colors with an ombré effect that is typical for cocktails. I fuzzy cut all the blooms and leaves from one of the "Crazy Summer" sheets and used one leaf die from the "Echinopsis Die" set to cut out some leaves from the design paper.
If you want to create an eye-catching detail, I recommend to go for a paper rosette. You can easily create one with an 2,5 x 30 cm stripe of paper. Just draw a line every 0,5 cm, fold it in accordion style and glue the ends together. Then press it down into a circular shape, take your glue gun and glue a small circle on the front and the back side of the rosette. Finally add some die cuts or other embellishments to decorate your rosette.
Another lovely decor is a shaker element. I tried this for the very first time by using the "Sparkly sequins" and I have to admit I don't know, why I haven't tried this earlier. I thought it's super complicated, but it's not! Start with a circle die and die cut a hole in your tag, then glue some acetate on the back side of the hole, put foam adhesive stripes around it and fill it with sequins.
Instead of covering it with another piece of paper I glued it directly on the big tag, because I embossed some greetings that should peek through. Last but not least: Shake it!
These tags where so fun to create. Give it a go and try it!
Have a happy crafty summer and stay safe!
Mandy.
I prodotti utilizzati:


Mandy Pätzold
Hey there!
My name is Mandy and I’m a stampaholic, jewelry designer, mom of two, wife and coffee & book addict from Potsdam (Germany). I first stepped into the world of stamping and paper crafting in October 2016.
I like card making the most, but I also enjoy making mini albums, gift packaging and layouts.
What I love about my hobby are the people I met and the friends I made on my way so far.